- System Settings - Manage Privileges and Permissions
- To Add a New Notification Template:
- System Settings- NOTIFICATION TEMPLATES
- System Settings -PUBLIC LIBRARY SETTINGS
- System Settings - Schedule Journal
- System Settings - CONTENT REPORTING PERMISSIONS SETTINGS
- System Settings -Users Permissions Settings
System Settings – Manage Privileges and Permissions #
Main Menu >> Settings >> System Settings >> Management of Privileges and Permissions

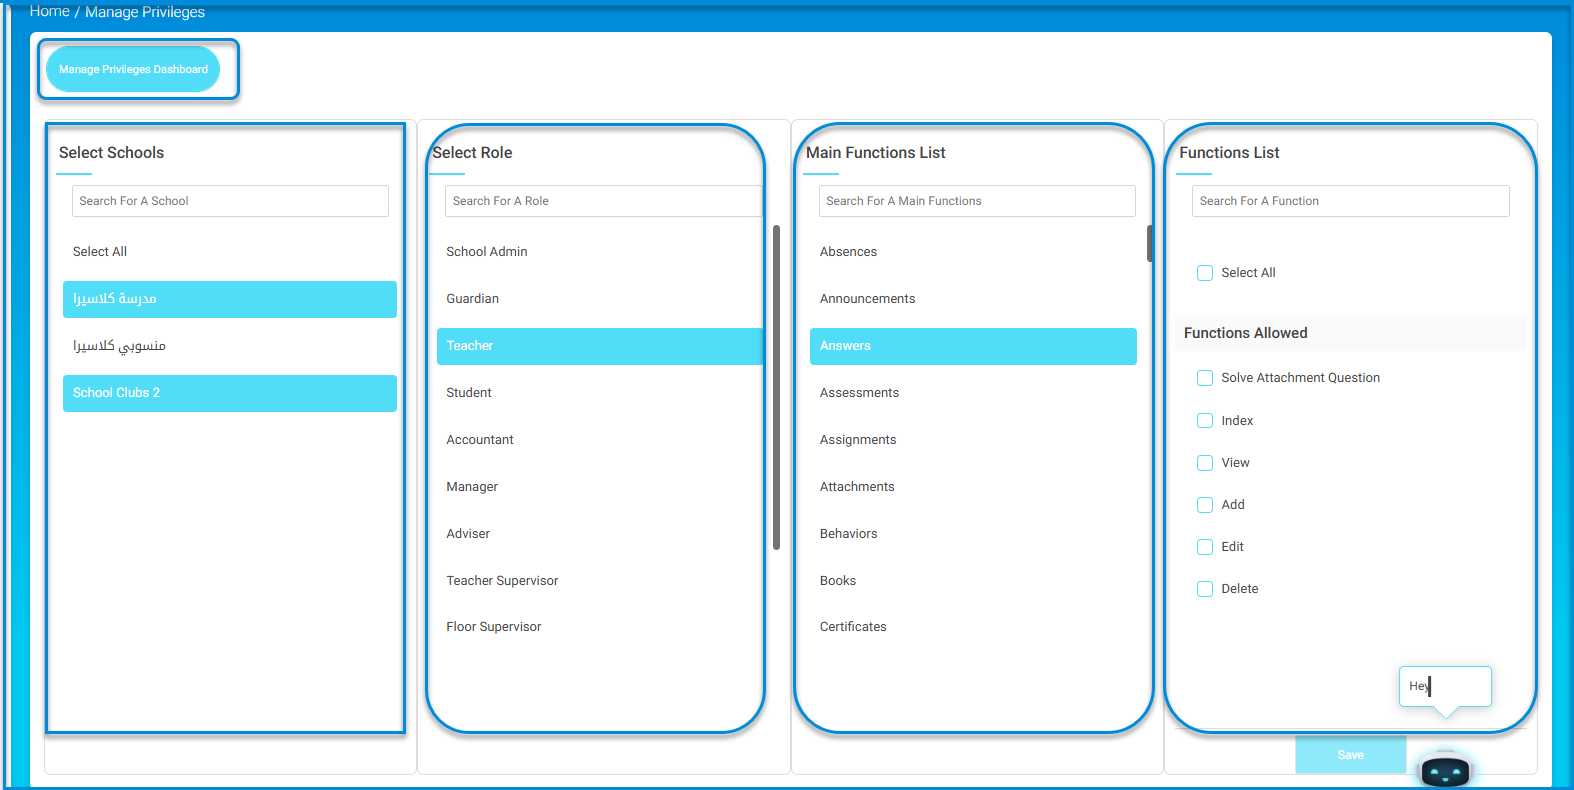
As a system manager, you have the authority to manage the privileges and permissions of users, which simply means you can manage who can do what. To manage privileges and permissions:
- Click the Manage Privileges and Permissions button on the system settings page.
- Select the schools you want to manage the privileges and permissions of their users, or you can click select all. Note: If you are a system manager for several schools, the options appear from the first school selection, but if you are a manager for only one school, the options appear from the first user group selection only.
- Select the user category.
- Select the main job.
- Select the check boxes for the jobs you want the user to access.
- Click save.
- Use the search fields to search for a school, group, or specific job.
- Select the “select all” check box to enable all functions for the selected user.
- Select the check box/boxes next to the services you want to block for the selected user.
his featue enables you to set a specific notification template for all users and add new ones. Main Menu >> Settings >> System Settings >> Notifications Templates
To Add a New Notification Template: #

- Click the Notification Templates button on the System Settings page.
- Choose the notification type from the drop-down list.
- Type the notification template you want in the first and the second languages.
- Click the Add New Template button.
System Settings- NOTIFICATION TEMPLATES #
This feature allows you to customize notification templates for all users and add new templates. Main Menu >> Settings>>System Settings >> Notification Templates
Note: Current templates appear if there are existing templates and if not, there are none. To add a new notification template:
- Click the Notification Templates button from the system settings page.
- Choose the type of notification from the dropdown menu.
- Enter the name of the notification template you want in both the first and second languages.
- Click the Add New Template button.
System Settings -PUBLIC LIBRARY SETTINGS #
Through this option, you can allow/not allow only the approved uploads to be displayed by activating the following toggle button:

System Settings – Schedule Journal #

System Settings – CONTENT REPORTING PERMISSIONS SETTINGS #
Through this option, you can specify the users allowed to review the reports.
Click the Display liabilities button to display the permissions dialogue box. Choose the type of content you want to grant permissions for from the dropdown menu. Select the user category you want to grant the permission to view this content from the corresponding dropdown menu “to”. Select the check box next to the names of the users you want to grant this permission. You can also search for them through the search box. Press the save button.

System Settings -Users Permissions Settings #

- Students Settings:
- Password Toggle Button: By enabling it, students can control whether to change their passwords or not.
- Username Toggle Button: When activated, students can change their login username on the platform, and the button can also be disabled to prevent username changes.
- Profile Picture Toggle Button: By enabling it, students are allowed/disallowed to add their profile picture to their personal account on the platform.
- Phone Numbers Toggle Button: It is activated to give students the authority to add or change their phone numbers.
- Email Toggle Button: It is activated to allow/disallow students to add or change their email addresses.
- Address Toggle Button: By enabling it, students are allowed/disallowed to change their address on their personal account.
- Guardians:
- Phone Numbers Toggle Button: It is activated to give guardians the authority to add or change their phone numbers.
- Address Toggle Button: By enabling it, guardians are allowed/disallowed to change their address on their personal account.
- Teachers:
- Password Toggle Button: By enabling it, teachers can control whether to change their passwords or not.
- Username Toggle Button: When activated, teachers can change their login username on the platform, and the button can also be disabled to prevent username changes.
- Address Toggle Button: By enabling it, teachers are allowed/disallowed to change their address on their personal account.
- Other Users:
- Password Toggle Button: By enabling it, users can control whether to change their passwords or not.
- Username Toggle Button: When activated, users can change their login username on the platform, and the button can also be disabled to prevent username changes.
- Address Toggle Button: By enabling it, users are allowed/disallowed to change their address on their personal account.
Note: Settings are configured based on the school administration’s instructions.


