-eport card #
The system enables adding student and school report cards on the main platform through the system administrator’s account, following these steps: The إدارة الدرجات page allows you to generate grades reports, such as, تقرير الدرجات - تقرير قائم علي المعايير.
- اضغط على القائمة المنسدلة إدارة الدرجات من القائمة الجانبية.
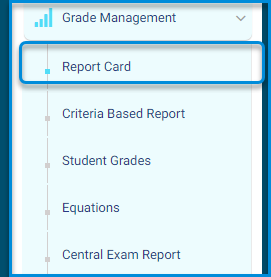
- انقر على زر تقرير الدرجات للانتقال الي الشاشة الخاصة بولي الامر
- the system navigates to the main screen of the report card, which contains various tabbed sections:
- إنشاء تقرير.
- إدارة الدرجات الحرفية.
- إدارة مجموعة الدرجات.
- رصد الدرجات النهائية.
- إدارة اعمدة الدرجات.
- خيارات أخرى.
- تحتوي على جدول بيانات جميع التقارير الموجودة واعداداتهم.
- تحتوي الشاشة على محرك البحث الخاص بعنوان التقرير.
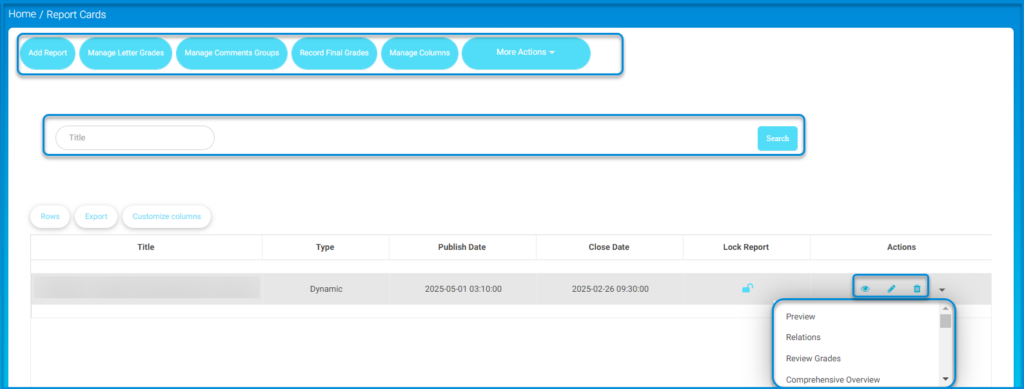

- انقر على زر انقر على زر إنشاء تقرير. .
- ينتقل النظام الة شاشة تحتوي على أنواع التقارير على المنصة الرئيسية:
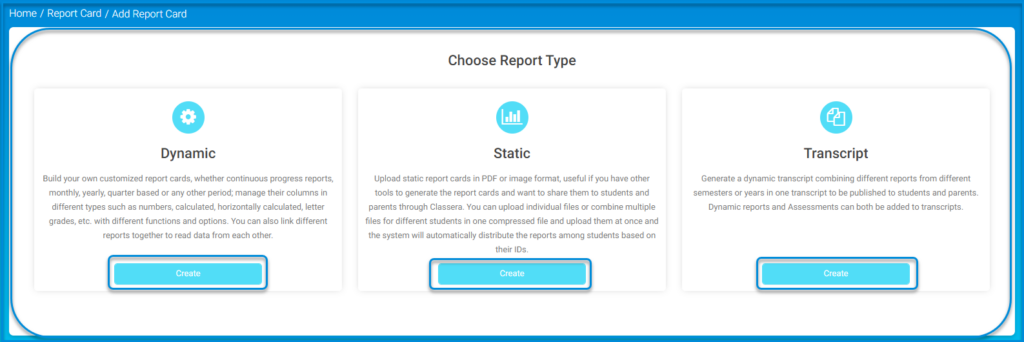
- ديناميكيةصمم تقارير الدرجات الخاصة بك ، سواء تقارير تقدم مستمرة ،شهرية ،سنوية ،ربع سنوية أو أي فترة أخرى ؛ إدارة أعمدتها بأنواع مختلفة مثل الأرقام ، المحسوبة ، المحسوبة أفقيًا ، درجات الخطابات ، إلخ ، مع وظائف وخيارات مختلفة. يمكنك أيضًا ربط تقارير مختلفة معًا لقراءة البيانات من بعضها البعض.
- الثابتة Upload static report cards in PDF or image format, useful if you have other tools to generate the report cards and want to share them to students and parents through Classera . You can upload individual files or combine multiple files for different students in one compressed file and upload them at once and the system will automatically distribute the reports among students based on their IDs.
- Transcript: Generate a dynamic transcript combining different reports from different semesters or years in one transcript to be published to students and parents. Dynamic reports and Assessments can both be added to transcripts.
- اختر نوع التقرير المناسب للمدرسة وقم بإعداده:
تقرير ديناميكى: #
- انقر على زر اضافة انقر على زر إضافة الخاص بالتقرير الديناميكي من خلال الشاشة الرئيسية لإضافة تقرير.
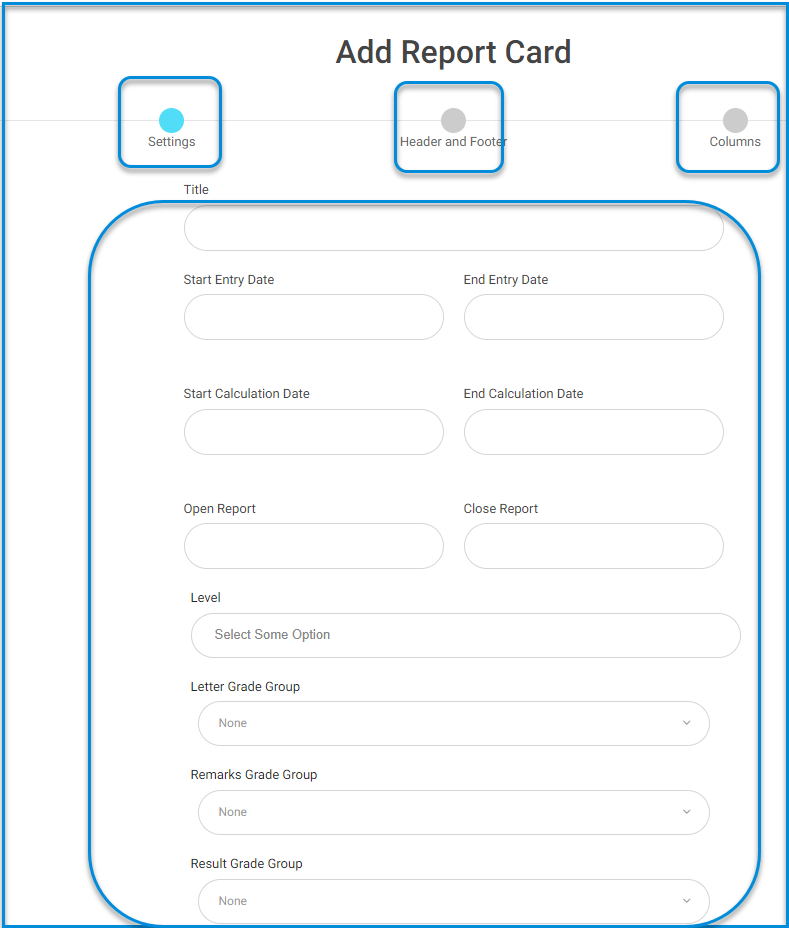
- ينتقل النظام لاستعراض الشاشة الرئيسية لإضافة تقرير ديناميكي وإعداداته الاتية:
- ادخل تاريخ بدأ ادخال الدرجات وتاريخ انتهاء ادخالها في الحقول المخصصة.
- قم بتحديد تاريخ بداية احتساب الدرجات و تاريخ نهاية احتساب الدرجات.
- ادخل تاريخ بدأ ادخال الدرجات وتاريخ انتهاء ادخالها في الحقول المخصصة.
- حدد تاريخ فتح التقرير للطالب وتاريخ غلقه.
- اختر الصفوف الدراسية الخاصة بالتقرير.
- اختر طريقة عرضة التقرير المحددة من قبل المدرسة.
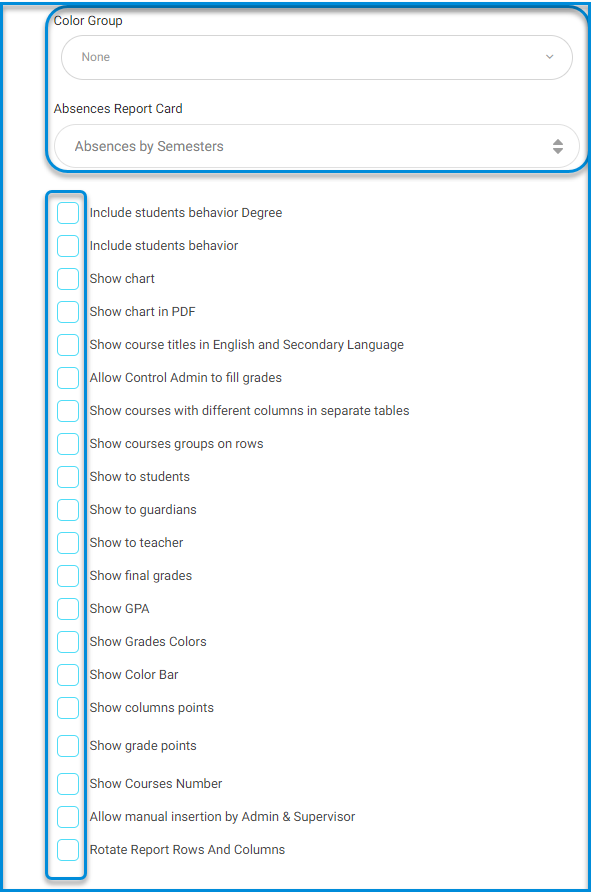
- حدد نوع الغياب وتأثيره على التقرير للطالب من القائمة المنسدلة نوع الغياب في التقرير.
- The school-specific settings include the following:
- Include students’ behavior Degree
- Include students’ behavior
- Show chart
- Show chart in PDF
- Show course titles in English and Secondary Language
- Allow Control Admin to fill grades
- ملاحظة: The system administrator is not allowed to control the filling of grades since it is the responsibility of the teachers to fill in the grades for the students and classes.
- Show courses with different columns in separate tables
- Show courses groups on rows
- Show to students
- ملاحظة: The report is not displayed to the student or parents/guardians until the grading process is completed.
- Show to guardians
- Show to teacher
- ملاحظة: The report is not displayed to the student or parents/guardians until the grading process is completed.
- Show final grades
- Show GPA
- ملاحظة: GPA display is selected in the case of a credit hour-based study system.
- Show Grades Colors
- Show Color Bar
- Show columns points
- Show grade points
- Show Courses Number
- Allow manual insertion by Admin & Supervisor
- Formative summative report
- Rotate Report Rows and Columns
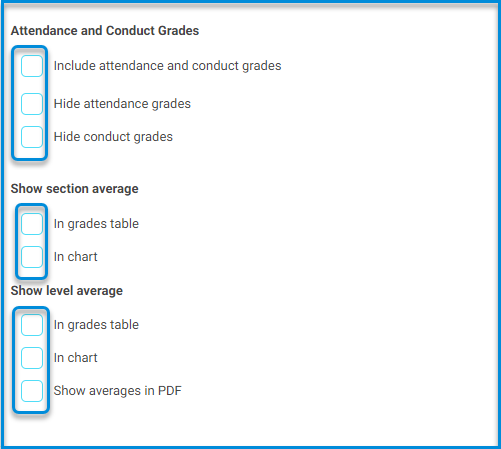
- Attendance and Conduct Grades
- Include attendance and conduct grades
- Hide attendance grades
- Hide conduct grades
- Show section average
- In grades table
- In chart
- Show level average
- In grades table
- In chart
- Show averages in PDF
ملاحظة: The report settings are determined according to the school’s needs and requirements.
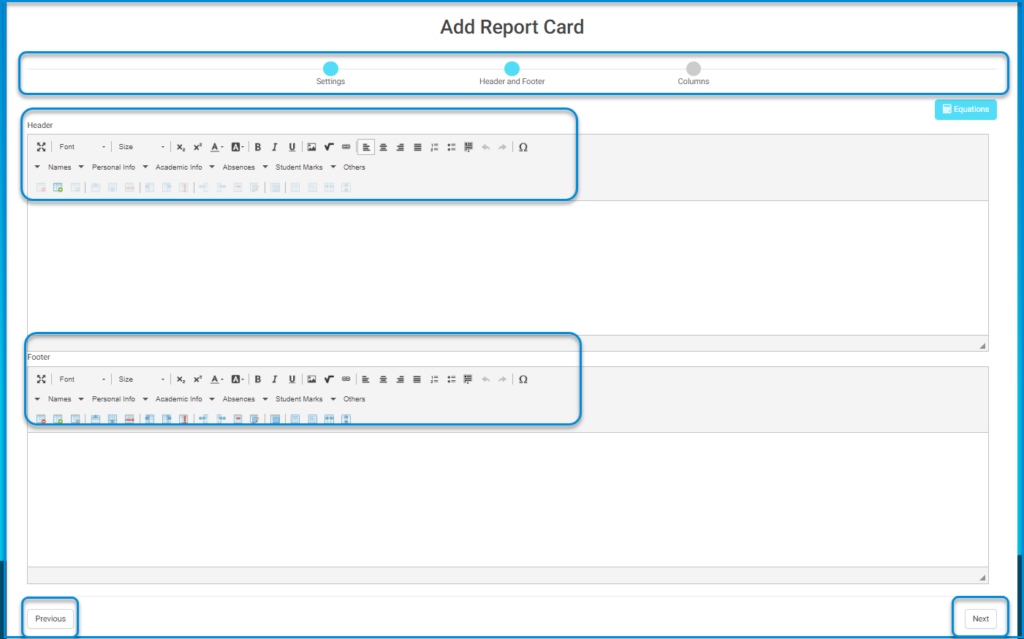
3) Click on the “Next” button at the bottom left of the screen.
- Second Header and Footer: This page is responsible for designing the report.
- Design the header of the page by writing the title of the report.
- Insert the school’s logo from the dedicated tab for inserting images.
- Insert specific data provided by the school administration to appear in the report header, such as the student’s name from the taskbar listed in the header.
ملاحظة: School-specific data can be controlled for insertion into the report header from the taskbars within the header of the page, and adding or removing each can be controlled by clicking on their respective menus.
- We move on to designing the footer of the page, which includes signatures and data specified by the school.
- Click on the “Next” button to continue with the settings.
- Third Columns:
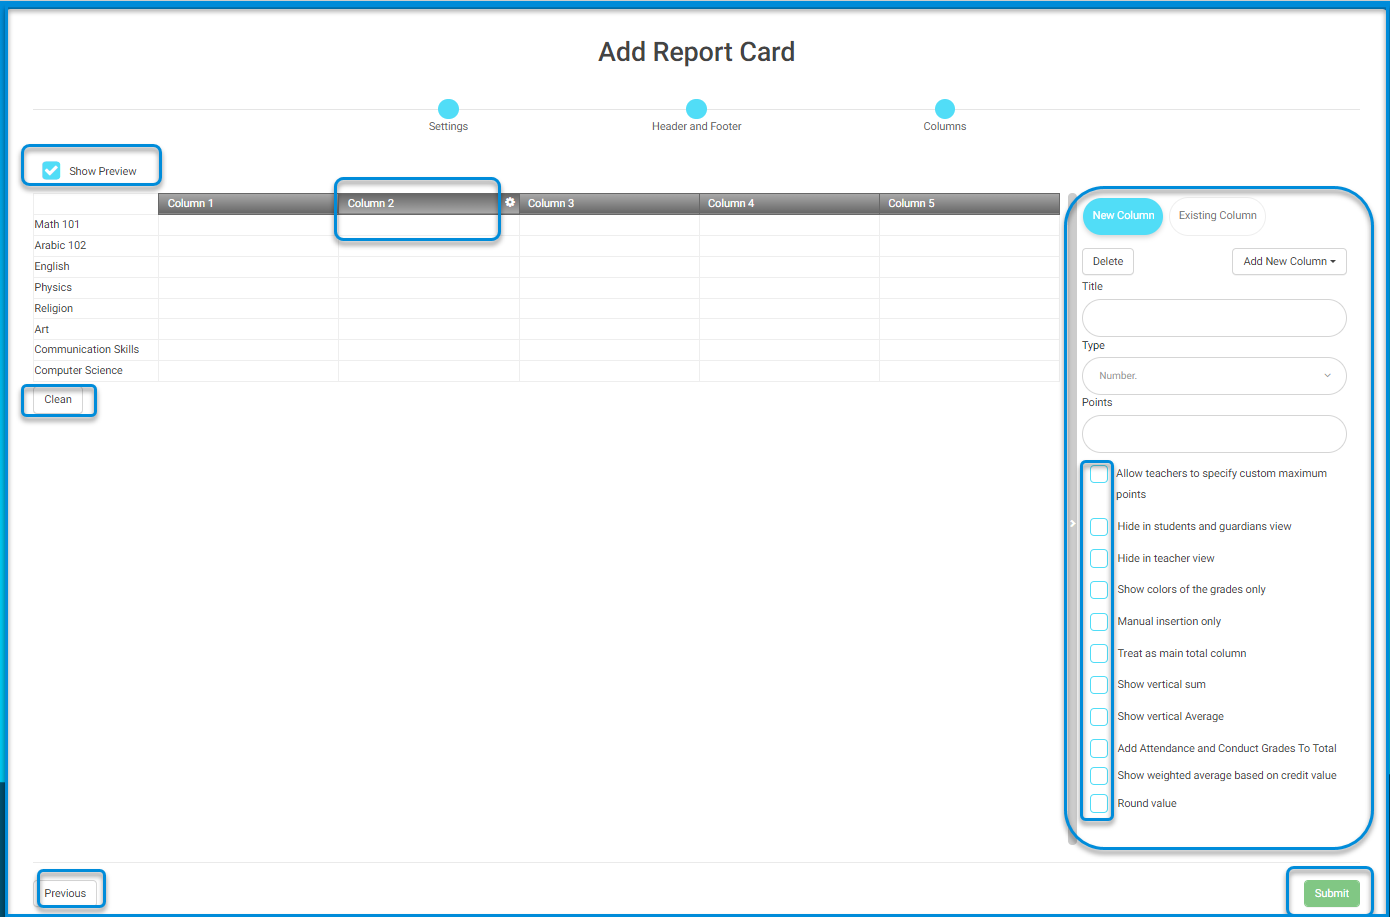
- The system navigates to the screen for column settings within the system.
- Click on the column to adjust the settings specified by the school.
- Columns can be added to or removed from the sidebar menu of the column table.
- Add a title specific to the column.
- Specify the type of the column.
- All settings are determined by the school administration and are prepared accordingly.
Note: Column settings are based on the column’s usage and the desired format according to the school administration’s instructions and specifications.
- After finishing, click on the “Submit” button to complete the dynamic report creation process
- A message appears indicating that the grade report has been sent to the cache and the grade report has been saved.
- The system moves to the main screen for dynamic reports.
- From the reports table, you can select and review the report.
- انقر على قائمة السحب الخاصة بالتقرير من داخل جدول التقارير.
- انقر على زر “معاينة”.


